
Summer Starts Here - Save up to 70%
Low-profile AC unit for ducted or ductless system lets you replace or add a new AC to your RV. Wall thermostat has an LED display and controls the mode, fan, and temperature settings. Air distribution box has 3 slotted registers for maximum airflow.
Features:
Specs:
Notes:
Videos are provided as a guide only. Refer to manufacturer installation instructions and specs for complete information.
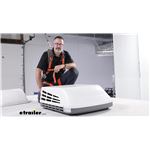
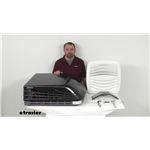
Hi, Don with Etrailer. Whether you're replacing a rooftop air conditioning unit on your trailer or if you're adding a new one, this is gonna be a good option for you, this is the new Low Profile series from Advent Air, this is gonna come with a white shell or a black shell. This is gonna come in two different power requirements with, depending on your camper size, and the output that it can handle, this is either gonna be a 13,500 BTU, or today's installation, a 15,000 BTU. Now in this particular camper, we replaced a much larger air conditioning unit with this smaller one, that's gonna be a smaller footprint, this is good for anybody that's looking to make a little bit more room up on top of the camper, whether it be for solar panels or optional other equipment that you wanna put on there. We did a size comparison between this newer Low Profile unit and the unit we took off, let's go check that out right now. Now just real quick, we wanted to show you the size comparison between the unit that we replaced in this Evertail unit over here, and then the new Advent Low Profile series here.
And it's not always about the size, this unit over here is a 13,500 BTU unit, while this Advent here is a 15,000 BTU unit, it's just, the dimensions are gonna be a little bit smaller for ya, and this is something to consider, if you have limited space, up on top of your trailer or camper, if it's loaded up with either skylights or vents, or TV antennas, and if your space is limited, you definitely want to check that. For instance, the height on our Low Profile unit, we're gonna be running about 11 inches above your rooftop, whereas on this unit here, we we inchesre about 14 inches. So you're saving around three inches just in height alone. As far as width, the Advent unit's gonna come in just around 25 inches or so. And on the Evertail unit that we're replacing, it's about 30 inches.
The other measurement I like to get is gonna be, from the intake, and exhaust, right here, on the bottom. It stops right here. And this is usually where people run into problems, on top of their camper. Because they'll have a TV antenna or something that's set up behind it, and it's gonna interfere with it, on our Advent today, that's only 11 inches. Whereas, on the Evertail unit, we're running about 13.5 inches with that, so, this is really an option to consider if you have limited space up on top.
So that really was a dramatic difference in size between the two. If your camper can handle the power consumption, I would recommend going with as large a unit as you can take. This particular model, if you go with the 15,000 BTU, it's gonna draw 15.4 amps while it's running. So just keep that in mind and check your camper's power requirements, make sure that you can handle that much. Let's go take a look at the inside, and check out some of the controls.
With this setup, you're going to get a thermostat here that's gonna power the unit, it's gonna be cool mode, a heat mode, and then a fan-only mode, and it's gonna have three speeds on the fan, high, medium, and low. So to cycle through, you can just hit the Mode button. And it's gonna control not only the rooftop air conditioner, but it'll control your furnace if you have one as well. If you just want fan mode, you can kick it to fan only, and then adjust the speeds to medium or low. As far as the air box down here, you're gonna have separate air duct controls, you can open these or close them, on this particular camper, we have a duct system, so, we have the option of having some air exit through here or go through the duct system, so this'll work for ducted or ductless systems. It has a washable, replaceable air filter element right here. If you can just pull that out, wash it, replace it back up. All in all, I think this is a great little setup here if you're replacing, or even if you're just gonna add air conditioning to your camper, Advent Air, they seem to be fairly easy to install, whether you have a Furrion system or a Coleman system or a carrier setup, we have different adapters available to make this unit plug and play. Especially if you're replacing the unit, you already have thermostat wiring run. This really is a fairly straightforward installation, if you wanna see how we installed our unit, and the thermostat on this particular camper, stick around. So to begin our installation, we're gonna start on the inside of the camper, if you're doing this as well, and more than likely, you're gonna be replacing an existing unit. It's gonna be similar to this, but depending on the manufacturer types, it's gonna be just a little bit different when doing this, but the first thing we're gonna do is get this cover removed. On this one it looks like I have four Phillips head screws. We'll get these outta here. So with that cover removed, it looks like we have four 10-millimeter bolts that are gonna actually be holding our air distribution box up here. Now more than likely, your electrical connections are gonna remain hooked up, of course, you wanna make sure that you have any AC voltage turned off. You're gonna have both 120 volts up here and 12-volt wiring up here. Need to get the lower plate disconnected from the upper unit here. We can start, this is gonna be the free sensor, now our new unit is gonna come with a new free sensor. So we can disconnect this, that'll go up with the old unit. We can disconnect the box, now the good news is, and this is what you wanna look at when you're replacing, you wanna see that your plugs are gonna fit up with the new box, and in our case, it's going to, we have different adapters for different boxes and manufacturers, so, you definitely want to check that before you make a purchase. Other than that, the rest of this is going to be thermostat wiring, we're gonna disconnect. And then our 12-volt wiring is gonna be right here. And then our 120-volt wiring is gonna be right here, and we're gonna have to open this box up and disconnect it from the inside. Okay. Now with everything disconnected, there's nothing right now that's holding the top unit on, when we took the four bolts out, that was actually what's holding this unit on. So we're gonna head up to the roof on this camper and remove this unit, and replace it with the Advent. I'm just gonna lift at the corners. It's gonna be a foam rubber seal, that goes that goes around, but, it might be sticking to your roof a little bit. But. Okay, gonna tilt this up. You're still gonna have your wires, like the free sensor wire. And then your control wires are still gonna be on. And you wanna be careful sliding the old unit and new unit around up here on your roof. Now anytime you're up on your roof and you're replacing an AC unit, it's a good idea to inspect your roof, and clean it up a little bit too, and that's what we're gonna be doing here today, make sure we don't have any dry spots, or dirt, and we're gonna clean up the mating surfaces here. Make sure we get a good watertight seal. So when you're placing this unit, you just wanna make sure you get it somewhat close to lined up on the hole here, you're gonna be able to reach up from the bottom, and adjust this however you need it. So, that's gonna work for us. And we can head back inside and tighten it down. If you need to move this around one way or the other, you can just square it up, make sure your seal it is even all the way around. And before we continue on with the installation, we can reach up on the inside and we're gonna pull down the power distribution cable that's up here. And now it's also a good time to install the free sensor. Now that's gonna come with your kit right here. We're gonna undo this. And the copper-colored end actually goes up into the evaporator up here, you're gonna see a blue plastic piece, that this slides right into. And that is one of the things I like that Advent does, it kinda makes it easy. Some of the other manufacturers out there, you have to get a screwdriver and sometimes move the fins side to side just to get the free sensor up there. So we have this installed. And, next thing we can do is install a control box. Now you'll wanna have your bolt kit handy. Just gonna run this straight up, now all of your wiring needs to go on the one side here, where the wiring. Goes. You don't want anything caught on the other side, this is the intake side. This is where the air is gonna get drawn up into the air conditioning system and the exhaust side over here, the cold air, comes down over here. So we're gonna be having a wall, a divider here, to keep these two areas separate. So we want to make sure everything is on this side, and it is right now. And we can just take our bolt, and we're gonna run them up, into the unit. And if you're lined up correctly, they should just start. I like to run the bolts up and make sure everything is centered, and then just snug 'em up. And we're just snugging these up right now. And once I make contact at all four corners, we'll make sure that this gets tightened up equally at all four corners here. Now as far as tightening down the upper unit to the lower plate down here, there are torque specifications in your instruction manual that tell you a torque value on these bolts, but I would also say that, you know, you obviously want this gasket up here to compress as much as possible, but, without deforming your ceiling, so, just kinda use your own judgment when tightening this up, we don't want the upper unit to move, we definitely don't want it to leak. But each ceiling's gonna be a little bit different. So to begin the wiring, we'll start with, obviously, the easiest ones, that's gonna be the plug from the upper unit. It's just gonna get plugged right in, these will have a flat edge on the top and bottom and in the middle, over here. And that'll let you know the orientation, this is only gonna be able to get plugged in one way. And then, our free sensor, that we stuck in, to the top, is gonna have a pigtail down here. And that's gonna hook up, just like the other one. And then from here, this is where it could be a little bit different for you. We're gonna hook up our thermostat wiring, our furnace, and our 12-volt wiring here. And then our AC voltage, so I'm gonna get all this wired up right now and we'll kinda overview it, in just a second. Something I do want to share with you, that took a little bit of troubleshooting on this, and you may run into this issue, on our old control box here, we had two wires for our furnace, we had a furnace positive, and a furnace negative, and on this Advent Air, there's only one wire, and it's gonna be just the way the disk box now controls your furnace. So on this one wire here, we hook this up to our furnace negative, and what that's gonna do is supply the power to our furnace, and we capped off the positive. On the other box, of course, we had the positive and the negative. But this is the way that it needs to be wired on this system, so again, this is the furnace control wire, that's hooked to your furnace negative, and this is gonna kick your furnace on and off, from the control box here. And then we just capped off, if you have a furnace positive wire like that, just cap that off. We have everything wired up, I've got my AC voltage wired here with the wire nuts. And I'll end up tucking that inside the box. And then the rest of this stuff, the thermostat wiring has been hooked up, and the 12-volt wiring has been hooked up, I'm just leaving it hanging loose for right now, because we need to do some work up inside the box. Namely, we're going to be installing this divider pan, so we can take off the styrofoam that came with it. Now, on most roofs, this thing's just gonna go up with no problems, if you have a thinner roof, insulation wise, this can be broken and cut along this line here for a thinner application, for us it's gonna work just fine. What you'll see on the inside of this unit is a white tape strip, along this back side. We need to take this off. This pan is gonna get installed up, and it's gonna stick to this, but, we wanna compress this gasket up against the bottom part of our upper unit there. What we're doing is we're just making sure air on this side stays on this side, and air over here on the other side stays over there, so, we're gonna put the divider up, and what I like to do, is kinda compress the gasket, make sure we're all the way up against the top of that unit up there. I like to use foil tape, this is not included in your kit, and this is like metal duct tape, and this foil tape, I'm gonna run this around the top edge up here, and also right here, and seal this up, before we put up this foam insulation, now this came with our kit. And what this is, this is gonna also be sticky foam. And we're gonna be applying this against the divider piece that we just put up here, what this does is it acts as a thermal barrier against the other side, and it'll just keep condensation from forming, and dripping down into your RV here. This is gonna be cut to fit, and you're gonna wanna cut this to fit this whole section here, and then stick it directly to it. So this was the end result over here, it's not the prettiest, I'll admit it, but, we've got the foam that's insulating the divider, and I just use foil tape wherever else I saw a hole in there, this particular system is gonna be using the duct work on either side, so, this is going to be all sealed down here, so any leaks that we woulda had going over here, or through the partition, is gonna be less air moving through our vent, so that's why I'm pretty particular about making sure that this stays insulated and sealed against the other side. Now over here on our wall, because we we inchesre replacing a unit with a thermostat, we already had the thermostat wires run. This particular thermostat is gonna use four wires, and that's pretty common. And the four colors they're gonna be using is blue, yellow, red, and green. Now you'll have a little diagram up here on the back, telling you which wire goes where, this is gonna be the 12-volt positive, the common or negative, and then your furnace A and furnace B wires. Now I've got all the connections on the back of our thermostat here. That's gonna complete all of the connections for our installation, now, I've went ahead and turned on the 12-volt power and the AC power. And what I like to do is just turn everything on before tucking this away and making sure everything's gonna work properly, so, I've got the fan on right now, and we're gonna turn it on. (fan blows) And that's gonna be blowing fan air straight out right now, on the bottom side, this is what we want. And we can check, we'll put it on cool and have the compressor kick on. So our compressor is kicked on. We're gonna let it run for a little bit, make sure it cools down. And if that's the case, everything's working normally. I'm gonna probably take some zip ties and get these wires tucked away, get the protective shield over our AC voltage here, and then we can install the lower plenum. You need to remove the filter And that'll expose four more of the screw holes here. Your kit's gonna come with screws and cover plates for these outer holes here. Just install these. I like to start in the middle and then end up at the four corners here. With all the screws tight, you can install the blanking plugs here. Looks like they are oriented, to where this little tab'll be towards the inside corner here. And then we can reinstall the filter, this filter is washable and removable. And that was a look at some of the features, and the installation of the Advent Air Low Profile rooftop air conditioner.
Average Customer Rating: 4.7 out of 5 stars (62 Customer Reviews)
Low-profile AC unit for ducted or ductless system lets you replace or add a new AC to your RV. Wall thermostat has an LED display and controls the mode, fan, and temperature settings. Air distribution box has 3 slotted registers for maximum airflow.I purchased this 15,000 BTU unit with the direction from customer service. I was told that it was a replacement for my original Dometic AC on my 5th wheel and that it would mount and have identical wiring.
They were very helpful and correct. It was extremely easy to replace. The mounting bolts and wiring hook up were identical to my old unit. The hardest part was getting it on the roof of my camper which actually wasn’t that difficult. I put an old piece of carpet (upside down) on the roof to protect it. I used my tractor with a front loader to lift it as high as I could then just set it up on the roof.
Once I removed the diverter/trim from the inside ceiling there are 4 bolts holding the unit in place, one wiring plug and the freeze sensor attached to the evaporator. Once that was all done it just lifted off the roof. After cleaning the roof where the old unit set, I simply set the new unit on the same seal footprint. I went inside hook up the wire plug, located the freeze sensor and tightened the 4 bolts. Don’t tighten the bolts too tight, just enough to hold it tight and adequately compress the foam seal.
The overall size of the new unit is shorter and smaller than the Dometic.
So far so good, I ordered two of these to replace my existing units.
One unit arrived damaged, but is working OK.
They seem a little noiser than the Coleman Machs.
Working good so far.
I don't know about longevity however I replaced 2 Dometic Brisk 2 systems on a camper I bought that needed a little more than tlc. It is a 2 zone Dometic system and these plugged right up. Only had them in a for a few days but they work great! Very pleased. I am hoping they last. Shipping was FAST and Etrailer kept me up to date on status. They were also very helpful with questions I had to make sure they would work with my system. I think these are actually quieter than the Dometics I replaced. Not hard to install, in fact the hardest part was getting them on the roof.
Good air conditioner, but fan won't shut off after set temperature is met
So EASY it aughta’ be CHEESY!!! Unboxed AC Unit, noticed two dents in the unit but none of the parts looked damaged or inconsistent; So I decided not to call regarding minor damage, instead I decided to install it by using two ramps I made out of scrap wood. TIP: the wooden ramps made it so simple to install the unit with minimal effort and two people. This made it a breeze to put in and I really recommend using this tip when installing your unit… The New Advent AC Unit made is so simple to plug into the dometic. This unit is made for easy installation and almost a universal fit. Great Experience at this establishment and happy with their product and selection of RV and Trailer parts. I will definitely recommend to all my fellow RV’ers! Happy Shopping! Always remember… Keep your library card updated!??????
The A/C seem to be a good value and the customer service from Britney was great. It was not clear to me that this unit didn't include all of the inside the camper components and thermostat as shown in the installation video.
Etrailer folks were extremely helpful! Sheila thank you! The casing had some minor dents in the sides therefore I gave 4 stars. I was able to pull them back out. Advent needs better packaging in their boxes to protect the unit!
Much more compact and lighter than original unit and came when anticipated. This unit Beatrice made sure the crossover from Coleman to Advent was compatible and right adapter was used. Love dealing with e trailer as I can speak to real people that I can understand and know what they are talking about.
Disappointed, I called before ordering the female I talked to told me that my current metal flange and plastic distribution would work with the new Advent AC. Not really, I tried to use the existing flange it turned into a huge pain. I watched the video for the install and it seemed to me that the divider or plenum was included with the AC- Nope, this part also I think is included with the lower unit part # ACRG15 but.... the customer service rep wasn't sure a little disappointed. So now I have ordered part # ACRG15 paid more shipping! In final learn from my mistake customer service reps are not sure about want you need for a complete job, just order everything send back what you don't use.
direct replacement as advertised,easy to do, hard part is getting it on the roof, good instructions, but I youtubed it, also to make sure I was right....definaly do it again,e trailer was great staying in touch..
The replacement air conditioner works perfectly. The base plate on my original Coleman was smaller, so we have to make some adjustments otherwise everything works great.
The Advent A/C was delivered in good physical condition. I have not installed it yet. UPS had it sitting in their truck on its end. I do not think that is good for the compressor. Hopefully it starts and runs with no issues when I install it next week. Fast friendly customer service and delivery. Thank you Etrailer.
Great service! Great prices! I had a question and technician answered quickly and explained everything.
Boxes arrived intact. Was kept informed about when it would ship, that it had shipped and had arrived and where they had dropped it off.
Was truly great experience! Will recommend to my other RVing friends!
Installation, went smooth without any problems
The unit is cooling very well
Everything was exactly what what I needed to get chilling again
Installed unit today ad is blowing ice cold. Direct replacement for my old unit. Shipped extremely fast
Bought this to replace an older (2007) Coleman 8000 on our pop-up. Had a bit of a time installing this. Please, READ THE INSTRUCTIONS and LOOK AT THE PICTURES. I had the upper duct that mounts to the roof unit installed 180 degrees off.
The converter kit that you buy with this if you're replacing a Coleman, didn't fit my Coleman panel. It's made for newer units. After talking to etrailer and the manufacturer I found I had to purchase a new control panel for inside. Another $85.
Overall it wasn't a bad job once I figured out the upper duct and the control panel issues. Unit cools well. About the same noise level as the old Coleman. It is not as thick top to bottom as the Coleman was. Think it's a little lighter after picking up both! Real test of how it works will be the trip we're taking next month.
excellent.plug and play install. so eas y!
The delivery was extremely timely and everything that was promised was kept! I know I will be calling again, as RV's always want some attention.
Thank you!!
I am very happy with my purchase,it showed up in only a few day and was exactly as advertised, additionally the ease of instalation was a pleasant surprise ans I am enjoying it very much.
Thank you etrailer keep up the good work!
My customer needed a unit asap . Ashley found a similar unit that was in stock for me. It shipped quickly and I installed it this morning. Called customer and she was a very happy camper!
Quick, great price and arrived exactly when they said it would.
Does not fit as advertised.
great service Brandon G did a wonderful job had no problem installing he gave me all the info I needed to get the job done is working great hope I will be able to work with him next time
So far so good bolted right up and we used it all weekend fan is a little nosier than the old one but not bad
Info for this part was:
At etrailer.com we provide the best information available about the products we sell. We take the quality of our information seriously so that you can get the right part the first time. Let us know if anything is missing or if you have any questions.


Thank you! Your comment has been submitted successfully. You should be able to view your question/comment here within a few days.
Error submitting comment. Please try again momentarily.